

Support
-
-
Software Name:
How to Reset PTZ IP Camera
-
Software Size:
-
Software Description:
Restore the camera’s factory settings in 2 parts
1. Restore the camera LINUX system: There is a reset button on the camera tail line. When the camera is working normally, press and hold the reset button for 15 seconds and release it, and the camera will automatically restore to factory settings
2. Restore the camera PTZ control part: Run the mobile APP or computer software, find the PTZ control menu on the software, and enter: 106+call+64+call on the preset keyboard. After the execution is completed, the camera will start the automatic reset operation. Please be patient, it may take 30 seconds (the camera will start the self-test process)

-
Download:
-
-
P6SLite 2LAN 4G ZOOM IP CAMERA Manual.pdf
-
Software Name:
P6SLite 2LAN 4G ZOOM IP CAMERA Manual.pdf
-
Software Size:
-
Software Description:
-
Download:
-
-
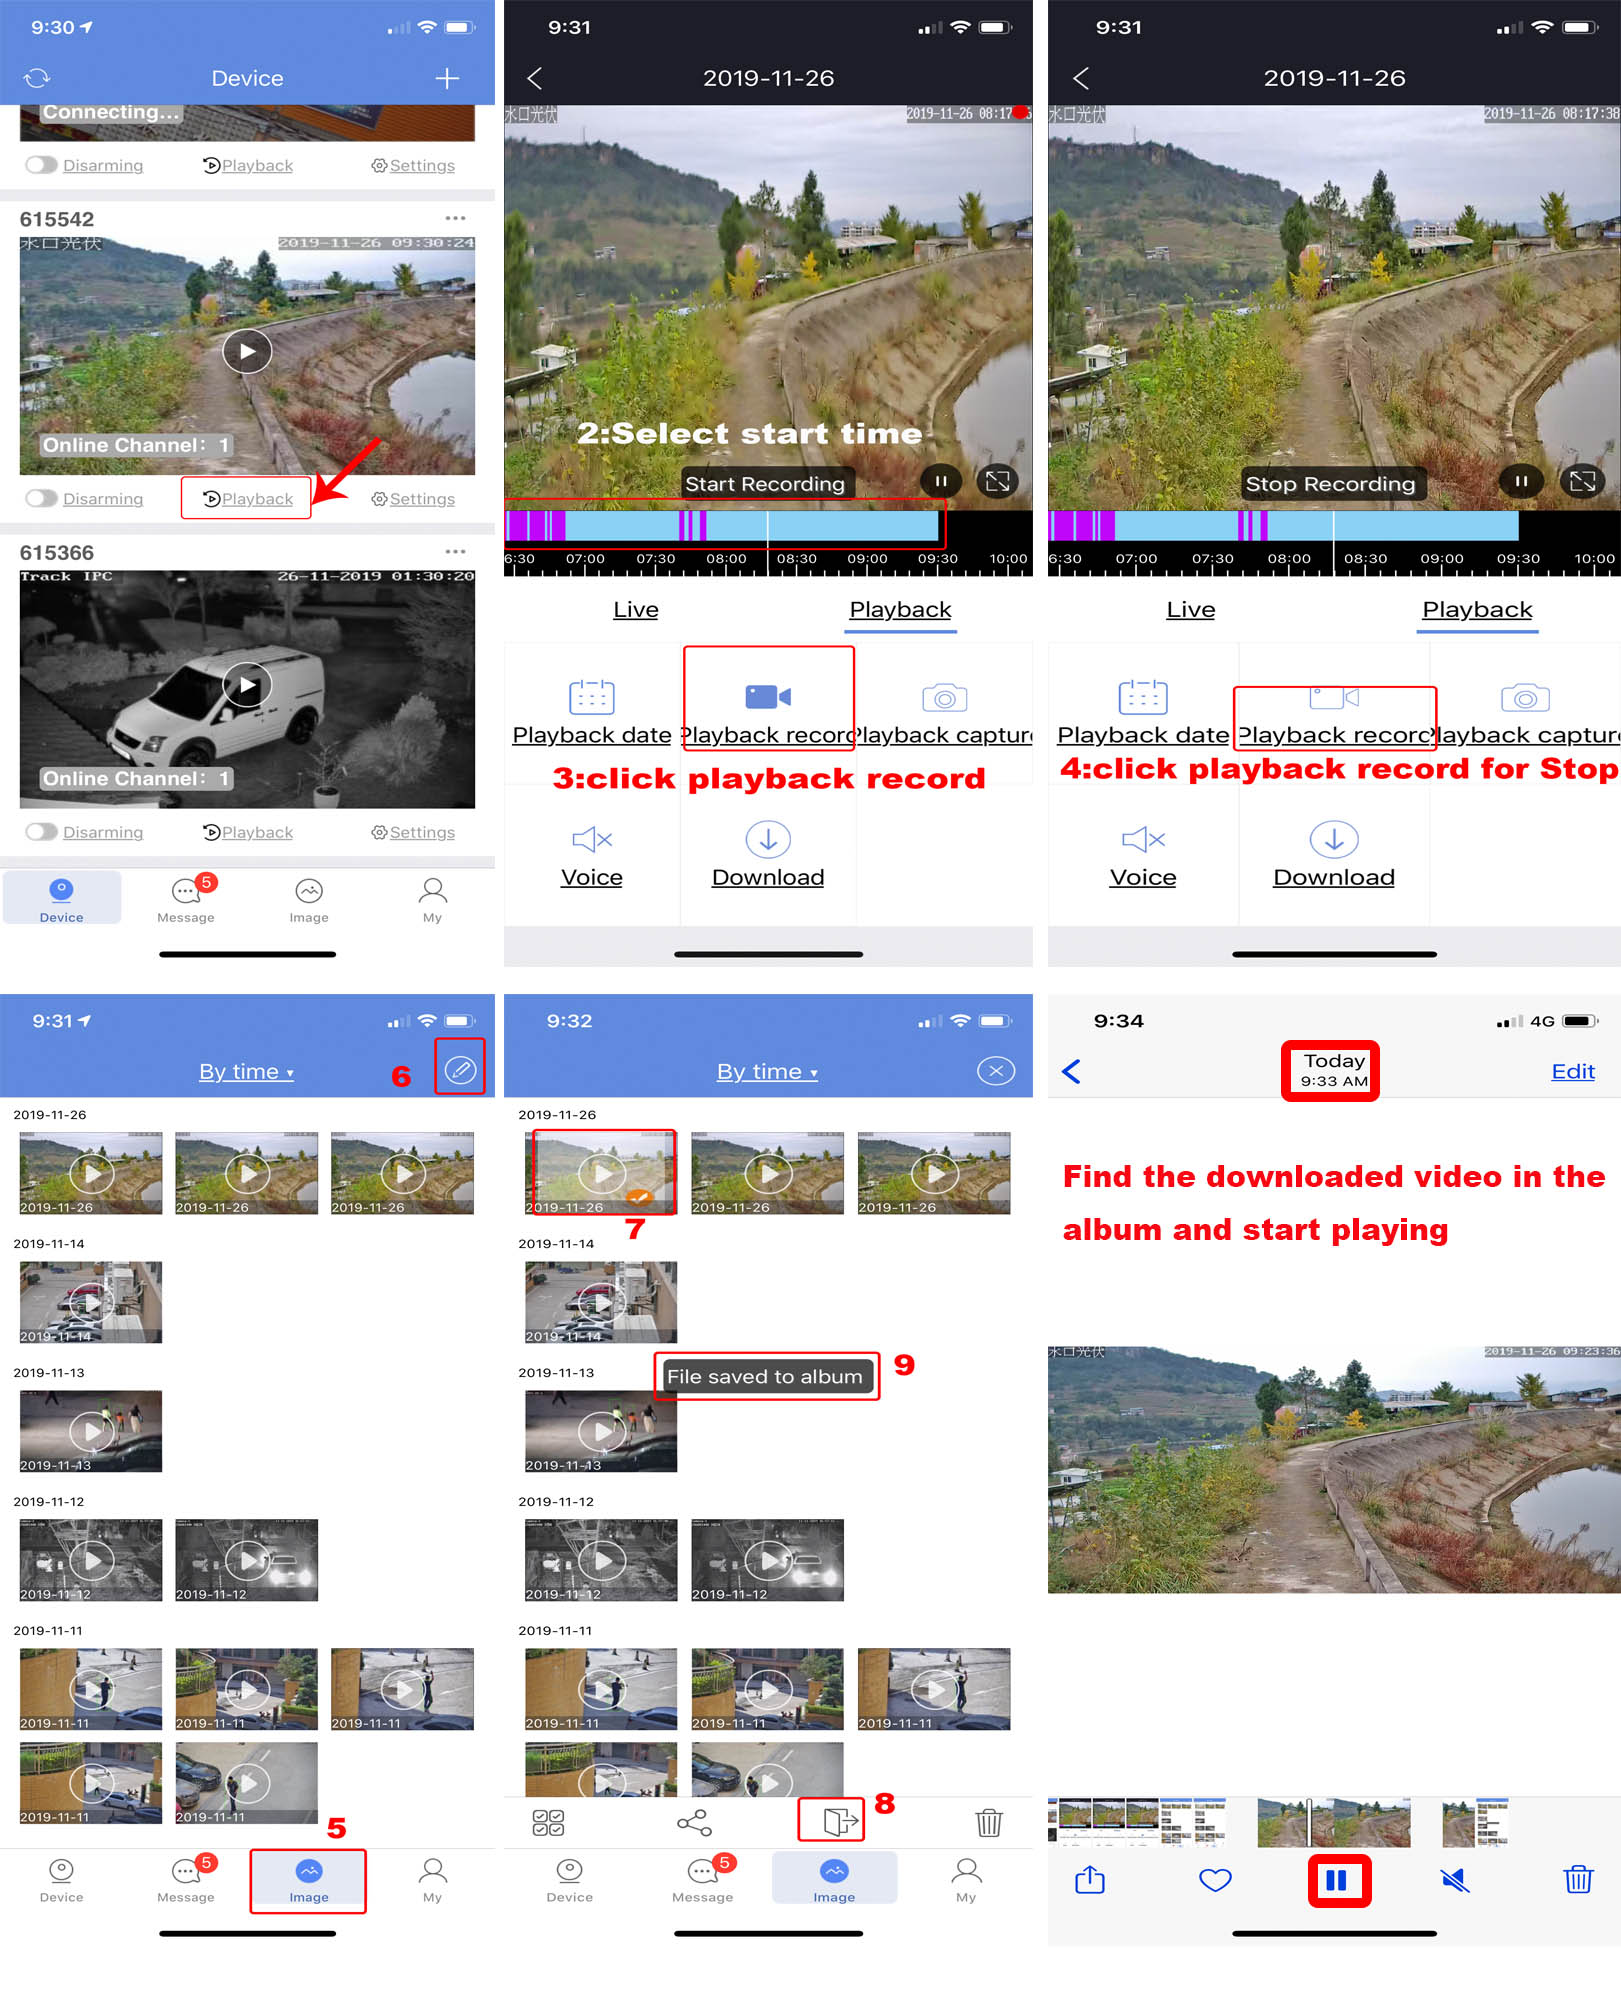
How to download Record files to phone album in P6S
-
Software Name:
How to download Record files to phone album in P6S
-
Software Size:
-
Software Description:

-
Download:
-
-
-
Software Name:
P03Z35LW4T20 Manual download
-
Software Size:
-
Software Description:
P03Z35LW4T20 Tracking PTZ ip camera Manual download
-
Download:
-
-
Full-featured and detailed 360-degree selecti
-
Software Name:
Full-featured and detailed 360-degree selecti
-
Software Size:
-
Software Description:
Smart speed dome programming instruction list manual
-
Download:
-
-
P6SLite Camera IE Browser manual
-
Software Name:
P6SLite Camera IE Browser manual
-
Software Size:
-
Software Description:
-
Download:
-
-
-
Software Name:
How to set sound alarm output
-
Software Size:
-
Software Description:
How to set sound alarm output
Prerequisite: The camera needs to support the speaker output and connect a speaker.
1,Open the P6SLite APP and enter the "settings" interface as shown:

Click "setting" find out "Alarm setting"

Turn on Motion detection ,Sound output,Push notification,and check Application, Audio output setting after completion of alarm trigger

Record a custom sound clip.click "Alarm sound setting",Turn on Siren linkage,and choose sound type:"Custom recording"

Then Press and hold the audio recording button to start recording. In the face of the phone microphone to start talking, the APP will automatically record audio,Max support 20 seconds of recording

After the recording is complete, click the "auditing" button to start testing the recording file. If you think this recording is perfect, you can click "Application" to complete the audio recording. If you are not satisfied, you can re-record.

If an alarm event occurs on the camera, the camera's speaker will play your recorded sound.

-
Download:
-
-
Why can't I receive push messages on the app
-
Software Name:
Why can't I receive push messages on the app
-
Software Size:
-
Software Description:
Why can't I receive push messages on the app
Before using the APP to push messages, make sure you are logged in with a registered account, because all messages are pushed based on our push server, so you need to log in with the registered account to use the server's message push.
Please do not log in to the app using LOCAL login mode.

When installing the mobile app, the app will get some permission requirements for you. If you don't agree to the app to get these permissions, your phone will not receive push messages. You need to open the permission again.
First you need to subscribe to this service on the main app interface.

Turn on Subscribed ,After the subscription is successful, you need to do some setup:
1,For Android mobile phone
Please Turn on your mobile phone, enter the setup options, find the "Apps ¬ifications">"Notifications management"

find out "P6SLite" and Enter the next level menu to set the permissions of P6SLite ,and Turn on these permissions as shown below, then return to the P6SLITE test push message


2,For Iphone:
1, Please Turn on your mobile phone, enter the setup options, find the "Notifications">"P6SLite" and Turn on these permissions as shown below, then return to the P6SLITE test push


3,Set on P6SLite:
Run P6SLite to find your device, first enter the setup options to set the push function. Then click the "Subscribe "button on the server to subscribe to the push feature. The camera will turn on message push if you subscribe to the push function.

-
Download:
-
-
Set the humanoid recognition alarm function
-
Software Name:
Set the humanoid recognition alarm function
-
Software Size:
-
Software Description:
Set the humanoid recognition alarm function
Open a browser, use the camera's IP address, follow the prompts to download the plugin and install the plugin, then close the browser and reopen the browser. Enter the login interface:

User:admin,No password. And click Login


Motion:enabled; Humanoid filtering:enabled;sensitivity:High
And choose trigger cappure (The camera automatically takes pictures and stores them on the SD card when the human form is recognized.)
Trigger record: (The camera automatically motion recording and stores them on the SD card when the human form is recognized and Each video recorded file size is 7M.)
Linked push:push a message to Cell phone APP(Need to open the subscription function on the app)
Motion detection area selection, generally use the mode's all-select mode
If the humanoid filtering function is enabled, the motion detection alarm will be triggered when the motion detection triggers and the humanoid is recognized in the humanoid recognition area.
The humanoid recognition area of the camera is shown in the figure:

Conditions for humanoid recognition:
1, when the height of the person is greater than or equal to 1/5 of the height of the monitor screen
2. The person must exist in the area shown in the figure above.
3. The software will draw a humanoid frame on the human body when the camera detects the human form. If you want to see this box, you must use the main stream to watch.
 :When the alarm is triggered, if a speaker is connected to the camera. The camera will trigger an audible alarm.There are three types of audible alarm functions: warning, dog, custom.
Warning:The speaker will trigger warning alarm When Motion+ humanoid recognition alarm triggered
Dog: The speaker will trigger Dog barking When Motion+ humanoid recognition alarm triggered
Custom: The speaker will trigger Custom voice alarm When Motion+ humanoid recognition alarm triggered(You need to record a warning tone on your mobile app.)
>>Open the app, go to Settings, then select Alarm sound.Select Custom recording,Then Press and hold the record button and speak into the phone with your mouth (the alarm tone you need
to record). Can record up to 20 seconds.

-
Download:
-
-
P6SLite mobile APP Quick Start Guide
-
Software Name:
P6SLite mobile APP Quick Start Guide
-
Software Size:
-
Software Description:
Part 1 【 P6SLite mobile APP Quick Start Guide 】
1,Go to the app store and download the free P6SLite app for your mobile device,available for both Android and iOS. Alternatively you can scan the QR code below to access the download page directly ( 1-1 ) .Click on either the Android OS or iPhone OS button to download the appropriate version for your device ( 1-2 ) .You can also download a Windows version to run on a Windows PC.

2, Launch the P6SLite app and following the instructions on the screen.
3. Account registration and server selection ;Users can use your e-mail to register an account level. You can also log in to the APP system directly using aTwitter account or use “Local”login.The user registration is as shown in Figure. Click on the first step in the figure, select the second step of the lnternational, and then select the third step to register. As shown in Figure, the user can select the region according to the actual geographical location. Select area (Foreign users can only register by email)

4.Add cameras
1),AP configuration:
① The camera only need to connect 12V power (for WIFI wireless camera)
② ,Open APP Home page, click
the icon in the upper right corner. Select “AP configure” Connect as shown in Figure 4-1. According to the prompt until the wifi search screen, select the AP at the beginning of ZWAP. If no WiFi hotspot is displayed, wait for the hotspot to start. ) Enter the hotspot password 01234567 as shown in Figure 4-2.

③ , Click
on the back button APP of the mobile device to show that it is connected as shown in Figure 2-3.(Note: If the configuration fails in the interface of Figure 4-3, it will return to the interface of Figure 4-2(This indicates that your WIFI password is entered incorrectly . ); this is the wifi hotspot connection! ! !
④ , If the hotspot connection is successful, it will enter the wifi configuration mode as shown in Figure 4-4. Select the known WiFi network to configure. If the configuration succeeds, the message “Setting the device's WiFi information successful” is displayed, as shown in Figure 4-5. At this time, the APP will automatically return to the home screen asshown in Figure 4-6. The WiFi of the camera has been configured successfully.

⑤ , Click on the home page list to show the connected devices. The camera will enter the preview interface
2),QR code added(The camera has been wired to your router)
① ,Open APP Home page, click
the icon in the upper right corner, select the QR code (you can also click on thesweep) as shown in Figure 4-7. QR code recognition will enter the Add Device interface as shown in Figure 4-8.

② Add a successful APP will return to the device home page interface, click the home page list to show the connected device. Will enter the camera preview interface as shown in Figure 4-9.
3),Add LAN device(The camera has been connected to the wide area network)
The camera must be connected with 12V power supply and network cable (Note: The camera has enabled the DHCP function by default. Please ensure that your network is normal, and the device to be added by the APP must be in the same network environment. If it cannot be added, please check Your network is not a product quality issue)
① Open APP Home page, clickthe icon in the upper right corner, and select Add LAN Device as shown in Figure 4-11.
② Click to search for the device as shown in Figure 4-12
③ As shown in Figure 4-13, click “Save” in the upper right corner of the device (the password is empty). If the application is successfully saved, the device will return to the device management interface. Click the Home page to display the connected device. Will enter the camera preview interface as shown in Figure 4-14
4),manually add
Open APP Home page, click
the icon in the upper right corner and select “Add manually” as shown in Figure 4-15. As shown in Figure 4-16, the name can be entered according to your needs; the UID number can be found on the airframe or the outer package as shown in Figure 4-17. Note the case when entering the UID. User name and password are the default for the first time.

Complete the operation of Figure 4-16. Click Save. Adding a successful .APP will return to the device's home page. Clicking on the home page list will display the successfully connected devices. Will enter the camera preview interface as shown in Figure 4-18
5, Home page interface, real-time preview and function description
1), home icon uses as shown in Figure 5-1
Part 2 【 APP Quick button function introduction 】
1,Control zoom function:Figure 2-1

Click the
 on the APP interface, and the APP
will pop up
on the APP interface, and the APP
will pop up  function button. Click + for
ZOOM+,Click - for ZOOM-
function button. Click + for
ZOOM+,Click - for ZOOM-2,Manual Focus ,If some scene cameras cannot complete auto focus, users can use manual focus to get a clearer image.:Figure 2-2 ,Click the
 on the APP interface, and the APP will pop up
  function button. Click + for Focus +,Click - for
Focus -
function button. Click + for Focus +,Click - for
Focus -3,Set and Call preset:

Click the
 on the APP interface, and the APP will pop up Numeric keypad button. You can use this numeric keypad to set presets, call presets and turn on some special features . If we need to set the 1th preset , we need to Click 1 on the keyboard, then click the
  button to set 1th preset successfully.
4,Open Cruise and Close Crouse:Figure 4-1

Before using the cruise function, you first need to set some presets. The camera will perform the cruise according to some preset positions you set.
Example: Set 4 presets positions. We rotate the camera to the first position, Figure 4-1 ,enter 1, then click
 , rotate to the second position, enter 2, then click
  , rotate to the third position, enter 3, then click
  . Rotate to the fourth position, enter 4, then click
  . Thus 4 preset positions are set.
Then click the cruise button
 , turn it on, and the camera will cruise at these 4 positions to execute the cruise command.
5,How to use Watch position : Figure 4-2 ; The position where the camera returns when the camera is in standby mode

Rotate the camera to the position you want, then Click
 ( Figure 4-2 ), and the current position is the watch position, and Open this feature. When the camera is in standby, the camera will automatically rotate to this position.
6,How control PTZ
Click
 , Image pan/tilt direction button in the video box. Please follow these direction buttons to operate the direction of rotation of the gimbal
END
-
Download:
-
-
How to set the humanoid recognition alarm function
-
Software Name:
How to set the humanoid recognition alarm function
-
Software Size:
-
Software Description:
How to set the humanoid recognition alarm function
For P6SLITE auto tracing PTZ IP Camera
-
Download:
-
-
P03Z352W4T20 Tracking camera manual download
-
Software Name:
P03Z352W4T20 Tracking camera manual download
-
Software Size:
-
Software Description:
The Manual for P6Slite tracking ptz camera
Model:P03Z95W4T20,P03Z954T20P,P03Z954T20,P03Z95W4T20-A,P03Z352W4T20
-
Download:
-